24.9.11

My addiction is getting worse...


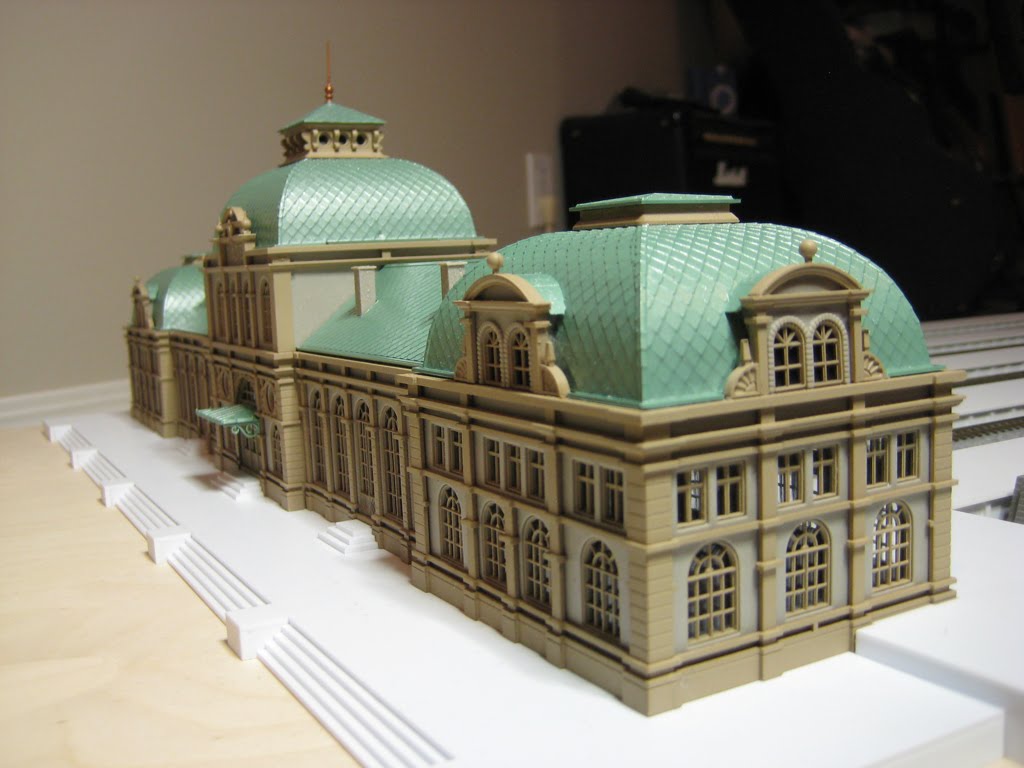
I picked up more paraphernalia for my stash... Cough. Cough. I mean parts for the collection. As you can see in the photo, the major acquisition was the Kato city transit station with the expansion set. I had placed the order with Hobbytech a couple of weeks ago and it happened to come in today. It was a pleasant surprise when I arrived at the store to visit with Johnny. I wanted to find out how the Edmonton train show went last week-end. The Kato products sold very well and his booth was well received despite the lower attendance this year.

It took a long time to convince myself to get the Kato station. I wasn't sure it would fit on my expansion area. Yes, I'm expanding the layout. Eyes roll up. I decided to branch the lines where they cross over the bridge. The new station is going in the location circled in red. It's going to be a nice complement to the Baden-Baden station with a more modern look.

Unlike the Baden-Baden station, this station took only an hour to complete. Out of the box, it comes pre-assembled with one street side entrance, but I wanted a street entrance on each side of the station. That meant I had to pop out the window. This was more difficult than I expected. I had to remove the roof first, which was secured with four screws. This exposed the interior of the building so that I could get at the window from the inside. The window was snapped into place. I didn't want to accidentally break the wall or the window so it meant applying careful pressure to pop it out. In the end, I had to file the lip down a bit before the window would come out. Once that was done, I screwed the roof back on and attached the second stairway entrance to the station by inserting it into the opening and then pushing down on the stair unit. The stair unit slid into place perfectly.

You may have noticed that there are no platforms. I elected not to buy the platforms due to cost. They were really expensive. Instead, I will build the platforms out of styrene plastic. This will create a consistent look as they will match the platforms at the terminal station.

8.9.11

Are we hoarders?


One of my colleagues mentioned a show called Hoarders. It got me wondering if this hobby I'm currently involved in might have a higher percentage of people with this condition? I know a few people who could benefit from an intervention. I'm not there yet, but I do find myself collecting stuff that just sits in unopened boxes. Take for example this plastic arcade I purchased last year. I sit here staring at it and wonder where the heck was I going to incorporate this on the layout? Oh well, at least I managed to pull it out of the box and put it together. It's not a bad little structure although I wish Brawa did a better job at the edges where the panels meet. The seams are quite visible. Mmm, I wonder if I could elevate the cathedral so I can use this? Ack! Gotta stop that kind of thinking or I'll find myself laying track into the furnace room soon.

6.9.11

Labouring on Labour day


It was a very productive long week-end in regards to train stuff. Since completing the station, I've had a renewed passion in all things modeling. So much so that I placed an order for some more structures. Specifically, Vollmer models 7642 and 7641. The first one is a restaurant. It looks identical to the railroad man's corner house, but with awnings. The other one is a railroad man's house. I ordered two of each to sit on each side of the cathedral for symmetry. The plan is to place a large market square in front of the cathedral, which means moving the cathedral back. Unfortunately that also means I have to replace the benchwork with a longer one. The colour scheme of these new structures also needs to be rendered more subtle. They are red coming out of the box, which conflicts with the copper green roofs of the station and cathedral.

.Speaking of colour, the new copper green roofs on both structures turned out very well despite my poor painting abilities. Thank goodness the Tamiya spray paints are very forgiving. I wanted to replicate the look and feel of Canada's parliament building. The glaring difference is that the parliament building architecture is Gothic, whereas my cathedral is Romanesque and the station is Baroque. Not only are my trains a mix, but so are my buildings. If my trains and layout was a dog, it would be part akita (Shinkansen), part shepherd (ICE) and part poodle (TGV).


As I indicated in the previous post, I had to build a brand new platform to accommodate the station. This went quicker than I had expected and I'm pretty happy with the results. There was a minor mishap with me spilling the bottle of solvent on my workbench. Some of the solvent soaked the platform, but fortunately it was only on the surface covered by the building. As a result, I am now very careful where I place the solvent. Ordinarily I'm a very cautious person, but I'm a klutz at four in the morning.


The only complexi
ty was assembling the steps. I wanted to make sure each step was equally spaced. So I built a little jig to make this a breeze. Being a novice at all this, I was pretty proud of myself for coming up with this template all on my own, although I'm pretty sure professional modelers already know about this technique. However, I've never seen any postings on this so I thought I'd share this with other novice modelers.

I also finished the awnings for the station. However I think I'll only keep the front awning. The back awning doesn't seem to match the track platform terminal layout. Design of the ceiling structures for the track platforms are on hold, while I work on the city centre. Stay tuned!

28.8.11

Six months to Baden-Baden


I was initially intimidated by the number of pieces in the Vollmer's Baden-Baden railway station. So much so, that it had taken me six months to screw up the courage to start it. Once I got going though, I found it extremely enjoyable despite its complexity. Or maybe that was just the glue talking. Before I could start I had to resolve the colour of the windows. I disliked the harsh contrast between the original dark brown windows against the gray inner walls. My previous plan was to paint all the structures white, but I've had a change of heart since those early days and decided muted colours would be acceptable. I liked the colour combination of my Kibri Siegtaldom with the exception of the roof. So I thought the colours of the station should complement the cathedral. That meant I had to change the brown windows to something lighter to reduce the contrast. This was not an easy task as I spent hours at the hobby store comparing colours. In the end, I went with Tamiya's TS68, wooden deck tan. There are other brands that are less expensive, but I've used Tamiya paints before and have had good success with them. My only complaint with the Tamiya spray paint is that 100ml does not last very long.

After spraying the windows and letting them dry overnight, I proceeded to glue the windows to the inner wall sections. As with anything new, it took a bit of time to get to speed. Before I could glue anything, I had to remove each piece and trim off the excess plastic. I discovered that if I bent the window away from me when removing it from the frame that the remaining extrusion pointed in the opposite direction of the front facade. This made it much easier to clean up before attaching to the inner wall. I spent a better part of the week trimming and gluing windows. I actually looked forward to working on the station each night after an exhausting day at the office.


With the windows glued, I was ready to attach the ornamental stone wall sections to the inner walls. However, I wasn't entirely happy with the dark tan against the light grey of the inner walls. Picking an alternate colour to the dark tan was difficult so I decided to attach the inner walls together first, which was out of sequence. The instructions called for gluing the ornamental stone wall to each inner wall unit first, which seemed counter to what I thought was the correct assembly sequence. The work to glue the inner walls together went quickly and I was able to finish the inner walls together in one night. Seeing the five building sections together motivated me further.

Placing the unfinished structure next to my platforms helped me visualize its size on the layout. When I had bought the station, my first thought was that it was much too small. But now that I've seen it next to the platforms I think it will work out. One thing to note is that the dimensions of the structure is quoted as 510 x 115 mm. These measurements are taken from the edge of the front stairs to the back edge of the platform. The building foot print is actually 470 x 78 mm.

The instructions stated that the ornamental stone wall section be glued to the inner wall first. Then the combined wall unit is glued to others to form the building. I'm glad I didn't follow the instructions to the letter. By doing the assembly in the wrong sequence, I was able to ensure that the ornamental stone trim connected perfectly with no gaps at the corners. I also elected not to glue the ornamental section to the inner wall. Nor did I glue the roof section to the walls. I can put them together and easily take them apart. Why you ask? I still have aspirations to install interior lighting. I'm not sure how to do this yet, but at least I know I can get inside easily.

I made another trip to the hobby store last week-end for more spray paint. In the end, I decided to colour the ornamental stone wall to match the windows. You can see the two colours on the previous photo. The original colour seen on the back side contains more orange. The colour combination is more subdued than the original darker tan against the off-white. While comparing colours on Tamiya's website, I found out that the Baden-Baden station is now a performing arts theatre. Vollmer changed the colour of the ornamental wall section of their model. The real building is much lighter in tone.


One observation about using spray paints. It's best to hold the spray can vertically when applying the paint. Spraying the windows went fairly well as I was able to keep the can vertical. The windows had not been removed from the plastic extruded frame that they were attached to. This made it easy to mount them vertically for painting. But I had to detach each of the ornamental wall sections. The excess plastic was trimmed off so they would be properly coated with paint as they were on the exterior side exposed for all to see. I had each piece lying flat on cardboard for painting. This did not go as smoothly as I had expected. To avoid this problem with the roof sections, I had to devise a way to arrange the roof sections appropriately so that the spray can could be held vertically. I used a bunch of the excess plastic extrusion, glued them together and mounted the roof sections to it with scotch tape. It's not pretty, but it did the trick.

I didn't mind the slate grey of the roof and it did match the colour of the cathedral's roof. However, I elected to go with pearl green (TS60) to create a copper patina look. There was another colour called coral blue, but I thought it was a bit too bright for my liking. By altering the original colours of the Vollmer model, I am hoping to make it look unique enough that on first impression, people won't immediately identify it as a Vollmer Baden station. To kill two birds with one stone, I decided to paint the cathedral roof at the same time. I ran out of spray paint while coating the steeples. However, I was able to finish the Baden roof sections.


I still need to custom build a passenger meeting area for the back of the station connected to the track platforms. The base level of the doors at the back of the station are lower than my platforms so I'll have to elevate the station to an appropriate height. I have an idea on what I want to do here. Hopefully it won't take six months to start that. And there's a few touch ups like installing the awnings and clock to the building. Overall, I'm pleased with the results of the structure. I understand why many people prefer Vollmer over Kibri or Faller. Their attention to detail makes their models very realistic looking.

7.8.11

Heritage Park


My friend invited me to join him to see Heritage park where they have a small train museum. They even have an operational steam locomotive for people to ride around the grounds. My favorite is still Era V, but even I have to admit they don't build them like they used to. I was fascinated with the size of the snow plow. It was monstrous. If I was into freight, I would definitely build a winter mountain layout with a snow plow. It would be freaking awesome!

24.7.11

Lack of progress

I purchased this Kibri alpine church online a couple of months ago. I finally got around to gluing it together this week-end. Not much else to report this summer except for some minor purchases. Hobbytech is having a 30% off msrp sale this month so I picked up some more Kato unitrack pieces. I decided to put a station across the river from the main station. I'm debating whether to build from scratch or buy the Kato city overhead transit station. Seeing as how the Vollmer railway station is still sitting in the box, I'd be better off going with pre-fabricated kits.

29.1.11

Sniffing glue. Confessions of an addict

I jokingly mentioned in a previous entry that this hobby was an addiction and that Johnny at Hobbytech was my local dealer. After spending two weeks assembling my model cathedral I'm not so sure that isn't true. It's important to work in a well ventilated area when assembling structures as the fumes from the adhesives can make one light headed. Fortunately, most of my braincells have snuffed it a long time ago. Being incredibly dense, my head help to keep me grounded. Otherwise I'm sure I would have been crawling on the ceiling all week. I elected to use Testor's gel adhesive instead of the Kibri recommended brand. The Testor's glue cost $2 compared to $23 for the Kibri which is hard to get by the way. I discovered that adhesives are considered dangerous goods and consequently it is difficult to ship from Europe. The only drawback with the Testor's gel is that it is difficult to apply on small surface areas. I may opt for the liquid version for the Vollmer Baden-Baden station as it has a lot of small pieces.

I finished assem
bling the cathedral to the point where I can paint. I've left off the plastic windows until after I've painted. Unfortunately I missed a small window of opportunity to paint last week. It got up to 11c on Wednesday, which would have been perfect to spray paint outside. The temperature has dropped to -17c this week-end so I may have to wait until spring before I can paint. Oh well I'll begin work on the Baden-Baden station. Given how long it took to put the church together, it's going to take most of February to complete the station. There's a lot more pieces to assemble as it is a much larger structure with far more windows. In the meantime, here are pictures of the church. After working on this model, I've become a fan of Kibri and will probably acquire more of their structures.

12.1.11

Kibri 7025 general impressions

While I anxiously wait for the arrival of my station in the post, I thought I'd do some prep work on the cathedral (Kibri 7025). After my foray with assembling the Kato rural platforms, I knew I would need some tools. These tools include a cutter, an exacto knife and a steel file.

The plastic pieces are still attached to plastic tubes which are the remnants of the openings in the mold where the molten plastic was poured. These plastic extrusions need to be clipped off, hence the cutters. After the extrusions are cut off this leaves burrs on the plastic. I found using an exacto knife is perfect for removing much of the burr. If I do this carefully with the knife, it makes filing unnecessary.

Kibri uses a mortise and tenon to connect different parts together. This is a common joint in wood working and I was pleasantly surprised to see it used here. I'm not sure if this is specific to this structure or common among all the Kibri products. I'm hoping my Vollmer station uses something similar. The use of this technique is especially good in connecting two corner walls together provided the joint is properly aligned. However, not all corners are perfect as you can see in the following photograph. You can definitely see a gap. The mortise and tenon in this plastic mold section wasn't correctly aligned so I'll have to do some filing on the tenon section to make the gap disappear.

For the most part, the detailing is pretty decent. There are some blemishes in the steeples, but it is minor. There is a visible seam in the external wall of the apse section of the cathedral. Aside from these and the small gaps between some of the wall corners, it's not bad at all. Something I do appreciate is that the window and door frames are molded separate from the wall sections. This allows the modeler to paint the frames in a different colour easily. For my situation, this isn't necessary as everything will be painted white except for the roof section. The other thing I like is the base where the structure sits upon. Again, Kibri uses a mortise and tenon to connect the main church pieces to the base foundation. I don't have any experience with other structures other than the Kato rural platform, but I think this Kibri romanesque cathedral is a good structure despite its minor flaws. If I had to grade it, I'd give it a grade point average of 3.3 out of 4.0.

I'm uncertain about whether to paint with a brush or use aerosol. Unfortunately, to use aerosol, I would have to wait for a warm enough day to spray paint outside. Problem is that the forecast is for below -20c for much of this week. I also plan to paint the inside walls black in case I decide to illuminate the interior with LEDs. The plastic is thin and any interior light would make the walls glow. An undesired effect.