
Línea Contorno de Madrid. 34
3 months ago


 During setup, I discovered why Kato sells separate packages of rail joiners. As I was connecting and re-connecting track, the metal piece broke off a few of the rail joiners. You can see the missing metal piece in the track situated on the right side in the picture. Fortunately, I had purchased extra rail joiners and was able to replace them. The blue plastic is used to remove the joiner from the track.
 The reason for connecting and re-connecting the unitrack was that I had finished my platform for the city overhead station. The construction of this platform went fairly quick. However, I made it too long and consequently both ends of the platform were too close to the S curves. I had forgotten about clearance so when I ran my train through the station for the first time, it was rubbing against the corners of the platform. Boy did I feel dumb! So I had to shorten the platform and moved the S curves further away from the platform. A mitre box and hacksaw certainly came in handy for this, but it wasn't pretty.


 What with having to shorten the platform because I forgot about clearance and the shattered remnants of a bridge gone wrong, I was feeling pretty miserable. So I thought some retail therapy might cheer me up and picked up the Minitrix LINT train set. Despite some setbacks this month, I'm pretty happy with the progress I've made and I gained more knowledge about modeling. Hopefully this renewed interest in trains will continue through to December. Now if only I could figure out what to do about that damn bridge.


 It took a long time to convince myself to get the Kato station. I wasn't sure it would fit on my expansion area. Yes, I'm expanding the layout. Eyes roll up. I decided to branch the lines where they cross over the bridge. The new station is going in the location circled in red. It's going to be a nice complement to the Baden-Baden station with a more modern look.
 Unlike the Baden-Baden station, this station took only an hour to complete. Out of the box, it comes pre-assembled with one street side entrance, but I wanted a street entrance on each side of the station. That meant I had to pop out the window. This was more difficult than I expected. I had to remove the roof first, which was secured with four screws. This exposed the interior of the building so that I could get at the window from the inside. The window was snapped into place. I didn't want to accidentally break the wall or the window so it meant applying careful pressure to pop it out. In the end, I had to file the lip down a bit before the window would come out. Once that
  was
was  done, I screwed the roof back on and attached the second stairway entrance to the station by inserting it into the opening and then pushing down on the stair unit. The stair unit slid into place perfectly.

 .Speaking of colour, the new copper green roofs on both structures turned out very well despite my poor painting abilities. Thank goodness the Tamiya spray paints are very forgiving. I wanted to replicate the look and feel of Canada's parliament building. The glaring difference is that the parliament building architecture is Gothic, whereas my cathedral is Romanesque and the station is Baroque. Not only are my trains a mix, but so are my buildings. If my trains and layout was a dog, it would be part akita (Shinkansen), part shepherd (ICE) and part poodle (TGV).
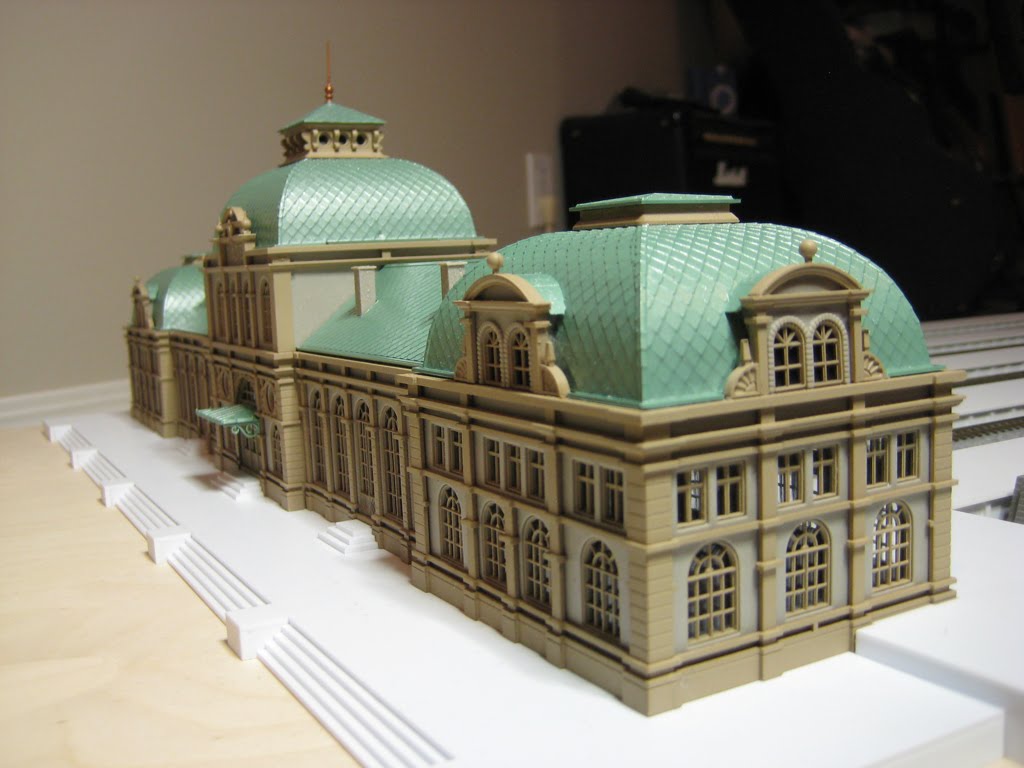 As I indicated in the previous post, I had to build a brand new platform to accommodate the station. This went quicker than I had expected and I'm pretty happy with the results. There was a minor mishap with me spilling the bottle of solvent on my workbench. Some of the solvent soaked the platform, but fortunately it was only on the surface covered by the building. As a result, I am now very careful where I place the solvent. Ordinarily I'm a very cautious person, but I'm a klutz at four in the morning.


 I also finished the awnings for the station. However I think I'll only keep the front awning. The back awning doesn't seem to match the track platform terminal layout. Design of the ceiling structures for the track platforms are on hold, while I work on the city centre. Stay tuned!

 I was initially intimidated by the number of pieces in the Vollmer's Baden-Baden railway station. So much so, that it had taken me six months to screw up the courage to start it. Once I got going though, I found it extremely enjoyable despite its complexity. Or maybe that was just the glue talking. Before I could start I had to resolve the colour of the windows. I disliked the harsh contrast between the original dark brown windows against the gray inner walls. My previous plan was to paint all the structures white, but I've had a change of heart since those early days and decided muted colours would be acceptable. I liked the colour combination of my Kibri Siegtaldom with the exception of the roof. So I thought the colours of the station should complement the cathedral. That meant I had to change the brown windows to something lighter to reduce the contrast. This was not an easy task as I spent hours at the hobby store comparing colours. In the end, I went with Tamiya's TS68, wooden deck tan. There are other brands that are less expensive, but I've used Tamiya paints before and have had good success with them. My only complaint with the Tamiya spray paint is that 100ml does not last very long.

 After spraying the windows and letting them dry overnight, I proceeded to glue the windows to the inner wall sections. As with anything new, it took a bit of time to get to speed. Before I could glue anything, I had to remove each piece and trim off the excess plastic. I discovered that if I bent the window away from me when removing it from the frame that the remaining extrusion pointed in the opposite direction of the front facade. This made it much easier to clean up before attaching to the inner wall. I spent a better part of the week trimming and gluing windows. I actually looked forward to working on the station each night after an exhausting day at the office.


 Placing the unfinished structure next to my platforms helped me visualize its size on the layout. When I had bought the station, my first thought was that it was much too small. But now that I've seen it next to the platforms I think it will work out. One thing to note is that the dimensions of the structure is quoted as 510 x 115 mm. These measurements are taken from the edge of the front stairs to the back edge of the platform. The building foot print is actually 470 x 78 mm.

 The instructions stated that the ornamental stone wall section be glued to the inner wall first. Then the combined wall unit is glued to others to form the building. I'm glad I didn't follow the instructions to the letter. By doing the assembly in the wrong sequence, I was able to ensure that the ornamental stone trim connected perfectly with no gaps at the corners. I also elected not to glue the ornamental section to the inner wall. Nor did I glue the roof section to the walls. I can put them together and easily take them apart. Why you ask? I still have aspirations to install interior lighting. I'm not sure how to do this yet, but at least I know I can get inside easily.
 One observation about using spray paints. It's best to hold the spray can vertically when applying the paint. Spraying the windows went fairly well as I was able to keep the can vertical. The windows had not been removed from the plastic extruded frame that they were attached to. This made it easy to mount them vertically for painting. But I had to detach each of the ornamental wall sections. The excess plastic was trimmed off so they would be properly coated with paint as they were on the exterior side exposed for all to see. I had each piece lying flat on cardboard for painting. This did not go as smoothly as I had expected. To avoid this problem with the roof sections, I had to devise a way to arrange the roof sections appropriately so that the spray can could be held vertically. I used a bunch of the excess plastic extrusion, glued them together and mounted the roof sections to it with scotch tape. It's not pretty, but it did the trick.


