31.12.10

Reality sets in

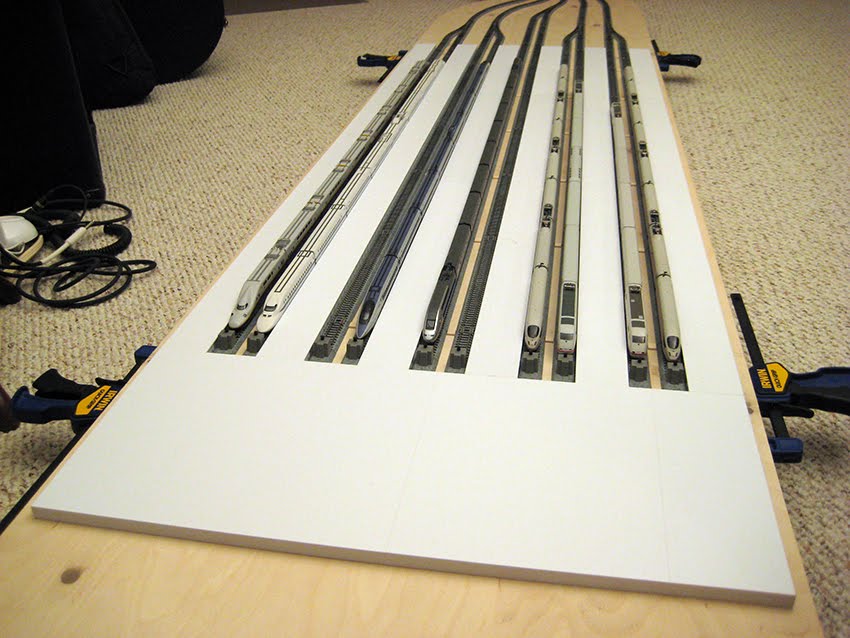
I was hoping to use the Christmas holiday to work on my layout. I finally realized why so many of my fellow modelers elect to use prefabricated structures instead of building them from scratch. The amount of detail required for each structure would take several lifetimes to finish manually.

I had some ideas for the station structure and thought creating mock-ups using cardboard would help visualize how it would look before starting on the final plastic version. Cardboard is far easier to work with than styrene. It took an hour to create the first prototype. I didn't spend effort adding architectural detail knowing it would be replaced by a styrene version if it turned out to be acceptable. I conceded defeat after seeing the first prototype. There was no way I could add sufficient detail that would meet my unrealistic architectural expectations. So I went online and ordered the Baden-Baden station made by Vollmer. Unfortunately it won't arrive in the post until next week when I'm back at work. I may decide to build my own station sometime in the future, but only when 3D printing becomes more affordable.

However, I did like the use of cardboard mock-ups to quickly visualize things. I think I'll continue to use this technique when designing new layout plans in the future. Here's to a new year of modeling. Happy New Year!

27.11.10

Jet lag

I'm suffering from some serious jet lag, but I had enough energy to post a picture of my new acquisition sitting in the station. Must sleep now.

23.11.10

HK store update

I discovered a third shop in Hong Kong that carry mostly Kato and Tomix with some Marklin and Minitrix items. The store was located in a warehouse. They were having a 40% off on the Minitrix locomotives, but they were pretty old evident by the out of date packaging. Unfortunately, I did not have my camera with me so no pictures. I was hoping they might have some Kato TGV or Eurostar trainsets, but they only carried Japanese Shinkansens and a couple North American locomotives and one Amtrak train set.

If you find yourself in Hong Kong with a bit of free time, check out these places. All three places can be reached by MTR. After a three week hiatus, I'm anxious to get back to working on the prototype roof structures for my railway station.


Lee Kwon Hobbies
Shop A, G/F, Wing Sing Building, 36-40 Temple Street, Yau Ma Tei, Hong Kong
(10 minute stroll from Yau Ma Tei MTR station)


View Larger Map

Concorde Hobby Shop
G/F, No. 331, Lai Chi Kok Road, Sham Shui Po, Hong Kong
(10 minute stroll from Sham Shui Po MTR station)


View Larger Map

KKC Toys
9/F, Edwick Industrial Center, 4-30 Lei Muk Road, Kwai Chung, Hong Kong
(20-30 minute stroll from Kwai Hing MTR station)

View Larger Map

11.11.10

Lee Kwon Hobbies

Jerry from Quinntopia inquired about what a model train hobby store looked like in Hong Kong. It had never occurred to me to take pictures so I went back to Mr. Kwon's store as it was the closer of the two stores. That's Mr. Kwon standing in the doorway. He's been a fan of trains since he was a little boy and was lucky to get into it as a business. He's been selling trains in Hong Kong for many years now. As you can see, it's a very tight fit in his store with items crammed from floor to ceiling. I really want to buy that Fleischmann ICE-T, but it would cost almost $900 Canadian. I'm still humming and hawing whether to get it. It's definitely more than my limit of $750 duty free will allow.

10.11.10

Hong Kong Transit

Many people use the Mass Transit Rail to get around in Hong Kong. It is an amazing subway system that carries millions of passengers every day between the island and across the harbour to the main land. What's truly amazing is that they can do it so efficiently. Although there are similarities between it and the Tube in London, the MTR is far cleaner and cheaper and the ride is so much smoother. There are a few more branches than the last time I visited. The other noticeable difference is that the platforms are enclosed by glass walls and doors. This was put in place due to people committing suicide by jumping on to oncoming trains. Hong Kong is a place of extremes and excess. Despite the stress, I find people here are very helpful and friendly.

The trams are still running in Hong Kong and we got a chance to ride one today as well. I'm glad they kept the trams, but the city is slowly getting rid of the old ones, which were built of wood and replacing them with new ones. Tram 150 is the only old tram with wooden beams still in operation.

9.11.10

Sevilla to Madrid via Hong Kong

I've been on holiday in Hong Kong, hence the lack of posts lately. Who would have thought I'd be able to find the Kato model 10-719-1 here in Hong Kong. It was a little overpriced, but a perfect addition to my railway station. It will sit next to my TGV, which runs from Paris to Stuttgart. That leaves two more openings on my railway station before I have to consider expanding. Now if I can get my hands on the TGV Thalys, I'd be a happy and destitute modeler.

20.10.10

Prototype 1

The first prototype is completed. I can't place my finger on it, but there's something not quite right with this design even with the additional beams. So it's on to the next prototype.

16.10.10

Prototype of platform roof structure


It's a little premature, but I thought I'd show the roof/ceiling prototype that I've been working on for the platform area. Most of the time has been spent trying to design something that I could live with. The actual construction of the prototype took me two nights to complete. The roof is suppose to resemble a glass ceiling to allow natural light onto the platforms. This design makes it simple to build the structure and it allows people to see through the roof structure where the passenger trains are parked in the station. I might include additional cross sectional support beams connected to the main longitudinal tubular beam that runs along the entire length of the platform. Seeing it now, the prototype needs a bit more architectural detail.


It took me quite a bit of time to come up with a method to assemble and dismantle the structure. As you can see in the first photograph, I glued a small diameter, short tube on the posts. This is going to act as an insert that slides into the main tubular beam to hold up the roof structure. This makes it easy to put together and take apart. I'm quite proud of the design. I'm uncertain about the look and feel of the roof structure though. I need to build a few more sections to see how they look interconnected. I'm happy I was able to introduce some curvilinear lines in my station/platform module. My biggest fear is that this current design might look like "Buck Roger's in the 25th century".

9.10.10

Kato 3-way extension cord

My kato 3-way extension cords came in today. They worked perfectly, though I did discover that one of the controllers was acting up. The turn-out fails to change direction when the switch on the controller is flipped too quickly. Fortunately, I had a couple of extra controllers and replaced the flaky one. Now I have twelve fully functional controllers working in conjunction with all eighteen turn-outs. I'll post a video of a locomotive operating across each turnout once I get the four main lines connected to the rotary switch / power supply. I'm really happy with how the 3-way extension cords worked out. It saves me from having to manage six additional turnouts.

2.10.10

Tamiya mini connectors

I came up with a design for the platform roof structure and needed some styrene to build a prototype to help better visualize how it would look. While I was at the hobby store picking up more plastic, it occurred to me that the Tamiya radio controlled cars use similar connectors as Kato, only they are a little larger. It so happens there is a miniature version of that same connector distributed by a company called MPI Maxx. They're a perfect match with the Kato connectors. The biggest complaint I have about Kato is that their extension cords are only 35" in length, which is much too short for long layouts. They retail for $3.80, which is a little expensive if you need to string multiple cables together. Now I can wire up my own cables! The connectors were only $2 each.

21.9.10

Stuck at the station

I thought displaying all my bullet trains on the platform module might give me some inspiration designing the station building. No such luck. I sit here pulling my hair, trying to work things out in my head. The difficulty is that I have to design something that is esthetically pleasing to look at, yet easy and quick to construct. Curvilinear lines present a challenge to schedule due to logistics, but I do like how they look architecturally.

At least the foundation connecting the individual track platforms is finished as you can see. This was influenced by my experiences in München visiting the main station. I had considered a station similar to the one in Köln, but I was concerned about the curved roof structure. The styrene plastic tends to become brittle when exposed to the solvent. The other concern is how the ceiling structure blends with the platform ceilings. I want it to be cohesive. This is fast becoming a difficult challenge. The problem stems from the limitations of the material I am working with. If only I had unlimited and unfettered access to a large scale, high resolution 3D printer. My cousin's husband mentioned a company called MakerBot, which sells a 3D printer kit you assemble yourself. I had considered getting one except the resolution is too coarse for my liking. The other drawback is it can only produce small models. Unfortunately, I have grandiose plans that exceed my skill set and free time. Sigh. Back to the drafting table.

19.9.10

Praha hlavní nádraží

Work on the station has begun. Right now, I'm just cutting and gluing the styrene pieces together for the foundation. I'm still trying to work out how the building structure is going to look. As I wait for the plastic and solvent to dry, I thought I'd sort through my photo archive of Praha hlavní nádraží. Jerry from Quinntopia had commented on one of my older blog entries that the tracks leading into the Prague station were almost identical to the look he was trying to achieve for his new station layout. So I thought I'd help out a fellow modeler and post a few more pictures for reference material. I included some interior shots. My apologies for the poor quality. The interior lighting was very dim.


12.9.10

Update

It's been a most productive week-end. The benchwork is complete except for the painting. I've drilled the holes for the cables, patched up the gashes and sanded the tables. I'm planning to lay the unitrack on the tables without permanently securing them. I didn't want to have to rig a scheme to connect the tracks at the edge of each module. It will also allow me to quickly store the modules without fear of damaging the track work since they will be packed in storage bins during transport. That is, if I ever decide to take my layout to shows. As a consequence, I had to install track guides. These help to keep the tracks in alignment with each other. The guides are simply rectangular pieces of wood glued strategically on the table surface. I went to many home renovation stores hoping to find some thin strips of wood. None of them carried anything small enough. I went to Michael's, but they only had balsa wood, which is too soft. After driving all over town, I finally came across a hobby shop that sold mixing sticks for stirring epoxy. They're essentially popsicle sticks, but they work. I just wished I didn't have to spend the whole afternoon driving around town.

The unitrack has been put back onto the layout and the cables have been strung through the new openings in the tables. There are a lot of wires! The biggest difficulty will be making sure the cables are connected correctly to their controllers. I'll likely go to a computer store this week and get tags to help easily identify the cables. I also placed an order for more 3-way extension cords so it will be a few weeks before I can test my switches/turnouts. In the meantime, I'll need to figure out how to rig up a switching device to control the power feed to the four main lines. I'll head over to Active Electronics and check out their inventory of rotary switches.

9.9.10

Switching

I've suspended disbelief and accepted the in-congruent realities of Shinkansens operating next to Inter City Expresses in Hel. However, I couldn't come to grips with having to control all eighteen turnouts on the layout. I was trying to figure out a way to make the task of switching less arduous.

Each turnout has a single solenoid built into the ballast running on direct current (DC). The solenoid is connected to a controller (Kato part #24-840), which is a momentary contact double pole double throw switch. I wondered if it was possible to control two turnouts with a single Kato control switch. I would have to splice two sets of cables to a controller, but I was more concerned if this might cause electrical problems with the turnout motors or the power supply.

Based on my research, six switches can be thrown simultaneously on a single power supply. Although there is no limit on the number of switches that can be connected to a single power supply. You just can't throw all the switches simultaneously otherwise it will short out the power supply. With care, I can avoid overloading the power supply.

The other and greater cause for concern was whether using a single switch to control two turnouts would cause the turnout motors to burn out. Those turnouts are quite expensive! Determining that it was possible to control two turnouts with a single switch, I was preparing to splice wires until I came across a thread on a forum about the 3-way extension cord (Kato part #24-827). It so happened that I had purchased one a long time ago for the purposes of providing power to several sections of the track. It never occurred to me that I could use this device to control up to three turnouts with a single switch. The little pamphlet that came with the extension cord even describes this alternate usage. I guess I had assumed the use of the device was reserved only for power due to the blue/white coloration of the wires. Whereas the wires for the switches and turnouts are colored red/black. It pays to read manuals as I saved myself from the unnecessary task of splicing and soldering wires. As a consequence, I managed to reduce the number of switches to twelve. Here's a short video of two turnouts being controlled by a single switch.


6.9.10

The first spike ...

The foundation for Hel Hauptbahnhof has been laid with the completion of the bench work. I was cutting wood much too late last night hoping to finish the final section. Unfortunately, I had to wait for the glue to dry before installing the support frame on the reducer module so the work didn't finish until today.

Due to the unusual curves of the reducer module, I had to be creative with the placement of the underlying framework. The shallow angles exceeded the range on my mitre saw so it took a lot longer because I had to iterate several times to get the correct angle. All in all, I'm pretty pleased with the result. The warp in the plywood has straightened out and the modules all align. I still need to drill holes for the turn-out cables, fill large indentations with wood putty and sand, but all the difficult rough work is complete. Now I can begin designing and building the architectural structures during the winter months. I'll likely tackle the foundation of the railway station first as it is the least complicated of the structures on this layout.


4.9.10

Labouring on the layout

Construction of the benchwork begins this Labor day long week-end. The forecast calls for rain all week-end so it's a perfect excuse to stay indoors and work on the train layout. In total, there are four modular sections. The layout is composed of a station, platform, reducer and bridge section. I elected to combine the interchange with the bridge to shorten the already lengthy layout. Doing so gave me more space to add the station extension, which is what I assembled today.

There are only end walls where the tables connect. I excluded the side walls so that the entire layout would look like it was on a thin shelf. It's a l
ittle difficult to explain what I am doing here, but I wanted it to appear that the entire layout was one thin sheet of plywood. Where the tables join, I will have some sort of table leg-connector, which will conceal the edge of the end wall. I haven't fully vetted out how this will be done, but I'll post pictures when I've sorted it out in my mind. It may be a while. I tend to over think things too much. Worse case scenario, I can always put on side walls if my plans don't work out. I'd like to avoid that as much as possible because it would require me to bend wood for the reducer section. Something I am loathe to attempt with my novice woodworking skills. It took me all afternoon to finish assembling the section for the station module.

In the photograph on the left, you can see the extensive use of clamps. I have to say they were indispensable as I glued the end walls to the bottom of the table top. I'm glad I picked up all these clamps when I started this layout. Although I appreciate the quick release of the Irwin clamps, they're not as sturdy nor as strong as a typical C style clamp with the threaded bolt. The Irwin pinch clamps are even weaker. I don't think they sell them anymore. The spring clamps have a tighter hold than the pinch clamps.

This photograph shows a close up of the 90 degree assembly braces. I bought the braces from Lee Valley specifically for this job. They were a bit expensive, but worth it! With the clamps, the braces definitely helped to keep things properly aligned while the glue set. As I said before, it pays to have the right tools for the job.

Just as a precaution, I hammered in nails to make sure the pieces would not separate. I first drilled a small hole to prevent the plywood from splitting as it is only 3/8" thick. Angling the nails will ensure the two pieces do not lift apart. By the way, the strips are only 3" wide. I wasn't expecting the tables to bear a lot of weight so I felt this width was more than adequate. I had these cut at Windsor Plywood as I do not have a table saw. It was well worth the shop fee to have them cut the plywood for me.

Lastly, I attached two 1" x 2" fir strips under the table top to prevent sagging. It took me all afternoon to assemble the station module. I'm expecting the other modules to go much faster now that I've sorted out the details. Hopefully I'll be able to post a picture of all the modules completed after this long week-end. Fingers crossed.

19.8.10

LRT


I've been so biased towards other rail transportation systems that I haven't given much attention to our city's light rail transit, which is currently being expanded. The city is extending the LRT to the west, constituting the third line to the system. Its coverage isn't as extensive as Munich's U-Bahn, but hopefully the city will continue to increase the number of lines over the next decade. This branch line is the first to have elevated tracks and consequently they've employed an interesting engineering system in the construction of this new line. I took a few pictures of the machine over the past few days. It's an unique engineering solution. It has been interesting watching the construction of the railway line over the past few months. You can see the smaller pieces being connected together to form the larger section between pylons, but I'm not altogether sure how they keep the pieces from coming apart, though it was evident that they were welding in the hollow part of the sections.

The city is also remodeling the platforms downtown to accommodate a fourth passenger car to address the increased ridership during rush hour. They've been at it for over a year. I think it's going to take another year before they can start operating the extra car. I'm looking forward to riding the LRT to and from work. Not that the reticulated buses are bad, but similar to cars, they are also susceptible to getting stuck in traffic jams. What normally takes twenty minutes sometimes turns into an hour or more getting home.

18.8.10

What's in a name...

The Hauptbahnhof name is starting to diminish in relevance with the addition of another Shinkansen to my collection. Maybe I should change the name to Hauptbahnhof-Shinkansen. My Series 500 order came in this week. It's a beautiful train set. I have to admit it is my favorite of all the Japanese bullet trains despite the fact I never actually rode on this particular model. Dare I say it might even beat the ICE3 in points for style. I bought the Series 700 for sentimental reason, but I suspect I'll be running the 500 more often. Here's a quick video.


Bahnhof, Estación, Gare, Nádraží, Shin, Stazione. After some thought, I decided to retain the Hauptbahnhof name despite the fact that my railway station will be home to a mix of ICEs, Shinkansens and a TGV. In Norse mythology, Hel was the last of the nine realms in the netherworld where people journeyed after death. Hel Hauptbahnhof was too good of a name to resist since my station is a terminus where passengers end their journey. I doubt anyone will get the obscure analogy.

10.7.10

Test run

Woo Hoo! I finally have all the unitrack pieces for my railway station layout and I was able to do a test run with a couple of locomotives. There are some connection issues at the unitrack joiners, but overall it works! As you can see, I managed to cut the table tops for each of the modular sections. The table tops are 3/8" birch plywood. These were cut several week-ends ago, but I didn't take any pictures of it until tonight. Getting clean looking curves on the reducer module was a challenge due to the lack of carpentry skills. I used a jigsaw to cut the plywood with a 20TPI scrolling blade. The large number of teeth on the blade helped to make nice clean cuts in the wood. It was definitely well worth getting the blade because it saved me from having to apply wood putty on any rough edges. Afterward, I used my electric sander to fix up parts of the curves. At times, the jigsaw had a mind of its own and decided to go in a different direction. I also used the jigsaw to cut the straight edges on the reducer and bridge section. I used my 90 degree angled aluminum strip as guide for my jigsaw to ensure the edges were absolutely straight. The next step is to attach the frame underneath each table top module. Although the birch plywood is good quality (it has seven layers), it still exhibits a bit of warping due to our dry climate. Unfortunately I won't have any time this Sunday to work on the framing due to the World Cup final. Spain versus Netherlands. There are too many other distractions keeping me away from the layout.

4.7.10

Kato Unitrack turnouts

After converting my layout to Kato Unitrack, I'd like to pass on some observations about the turnouts and double crossover. Kato has a limited variety of turnouts. In fact, there are only two turnouts - 481mm radius (#4 part number 20-220 and 20-221) and 718mm radius (#6 part number 20-202 and 20-203). What is odd is that only the #4 turnouts are DCC ready. As you can see on the back side, the turnout can be re-configured from DC to DCC by changing the position of the screws. As a consequence, they are more expensive than the #6 turnouts.

The #6 turnout can be made to work as DCC after a bit of re-wiring. However, this necessitates taking the back panel off the turnout. I have not attempted this operation as my layout is currently DC. If you're interested, there is a website by Allan Gartner who describes how to convert to DCC. Unfortunately he only provides schematics, no photographs. If you're like me and lack wiring skills, you're probably better off to buy the #4 turnouts. They're only a few dollars more, but at least you can quickly switch over to DCC when the time comes. Had I known this, I wouldn't have invested in the #6 turnouts. Fortunately, I only have a few #6 turnouts. The majority are #4, which I purchased specifically for the railway station layout.

For my interchange layout section, I purchased the double cross over (part number 20-210). Like the turnouts, the cross-over works flawlessly. No derailments at all. However, the cross over is insulated and the four quadrants each have to be connected to a feeder line. This is a problem as I was only planning to operate the railway station layout with a single power unit. To make it work with only one power unit I have to pull out the cross over and put in four turnouts. It's not as clean looking as the cross-over, but it works.

All in all, the Kato Unitrack works like a charm. Like I said in a previous entry, the point of going with Kato Unitrack was its reliability and smooth operation.

2.7.10

1:160 scale comparison

While work continues slowly on the railway station layout, I thought I'd take some time to compare the size of the high speed passenger trains in my collection. I've never had all of them sitting next to each other at the same time. My collection at present, include two Shinkansens, one TGV and four ICEs (Unlike the ICE1s, the two ICE3s in my possession are identical so I've elected to show just the one). The ICEs are built by MiniTrix and the others by Kato. I was curious whether there was a noticeable difference in size. I know that they are N-scale, but having read articles about the variability of structures between different vendors, I was curious whether this also applied to trains. I have no pictures to compare these trains at 1:1 scale. This is simply a relative visual comparison with no physical measurements to base upon.

Even if the models are not exactly 1:160 scale, it would be difficult to discern any difference. In all honesty, I wouldn't be able to tell if there were any discrepancies in scale. From the top view, you can see that the ICE1 locomotives are the shortest in this group followed by the TGV. Both ICE3 and Shinkansen E4 Max are about the same length. At least they are at N-scale. The longest is the Shinkansen 700. I haven't had a chance to connect all the cars together to see their complete length. I'll wait until the layout is completed before I pull them out of their boxes.

You can see from the front view that the Shinkansen is the wider of the high speed passsenger trains followed by the ICE1s. Then the ICE3 and finally the TGV. I thought this might be attributed to the track gauge employed in Japan was different than that used in Europe. However, the ICE, TGV and Shinkansen all operate on standard gauge track, which is 4' 8.5" wide. I had to look this up on Wikipedia. I recall feeling confined while riding in the Shinkansen. Several factors contributed to this feeling. The seats were packed closely to maximize the number of passengers. The other reason was due to the small cabin windows. I felt as if I was flying in a passenger airliner. This differed significantly from the ICE3, which I thought was spacious. Of course, the large reclining seats in first class probably helped to create that sense of openness as the European landscape sped past the expansive windows. It is no secret that North Americans are larger (okay, obese) than their asian counterparts. Perhaps this is the reason for the smaller seats in Japan. I hated flying JAL because of the lack of leg room.

18.6.10

TGV

My Kato TGV Paris-Ostfrankreich-Süddeutschland (Paris-Eastern France-Southern Germany) arrived in the post today! Although my heart is still set on the Thalys, the TGV POS is starting to grow on me. It will be a great addition to my growing inventory of high speed trains. My collection stands at two DB ICE1, two DB ICE3, one Shinkansen E4 MAX, one Shinkansen 700 and the TGV POS. I'm still waiting for the Shinkansen 500 to come in. I'd love to get an ICE2. Only Fleischmann makes that particular model, but it's way too expensive. Eurorail Hobbies has a ICE2 starter set priced at $800. Granted it is DCC ready and comes with a digital controller, but it's more than I am willing to pay. Besides, I'm still DC and would like to get the MiniTrix digital controller instead.

The detailing on the TGV is very good. However, just when I though Kato couldn't make a less user friendly coupler than the ones deployed on the Shinkansens, I was proved wrong. Talk about a poor design. There are two types of couplers on this TGV. The coupler on the locomotives were relatively easy to connect together. However, the couplers between the passenger cars were extremely difficult to snap together. In fact, I wasn't able to connect them fully. I didn't want to exert too much force on the cars for fear of breaking the coupler. That's why the gap between the cars was wider than expected in the photograph. Despite the poor couplers, I did manage to put the train through several test runs on the oval. It definitely runs fast even pushing ten cars.

I can't wait to get my railway station finished so I can display all the high speed trains together. Yeah I know it's not prototypical, but it's my utopian world. I just need to come up with a suitable name for the fictional city where the station resides.